Add Live unit status to real estate floor plans
Sep 22, 2025 · 10 min readStatic PDFs become outdated the moment they are published. An interactive floor plan displays live unit availability without re-exporting and manual edits.
Intro
In this guide, we will build a floor plan and connect it to a simple JSON data source, so floors and units automatically change color to red when their status changes to “sold”. We will start from an exterior view and setup popups showing the number of units available on that floor. Then we will build a floor plan for the first floor and setup availability for each unit.
The result is a plan that stays accurate and functional without extra maintenance:
Tool of choice
We will use our very own no-code floor plan builder MarkerKit. The free tier is perfect for small websites, and you get a ton of features out of the box:
- Switch views between exterior and floors
- Click a floor on the exterior to open its plan
- Draw precise polygons in a visual editor
- Show popups populated with live data
- Style polygons based on live status
- Track engagement with built-in analytics
Prerequisites: exterior view and a single floor plan
Note: To keep this guide short, we won’t go into detail about the basics of MarkerKit. If you need a step-by-step guide on how to create views and draw polygons, please check out this post.
Note: For the sake of simplicity, we will setup only the first floor, since the process can get quite repetitive depending on the complexity of the project. However, we will also show you how to use the Admin API for automation later.
For this demo we will need two artboards - one for the exterior view with a polygon for each floor, and another for the plan of the first floor with a polygon for each unit.

To setup navigation, select the polygon for the first floor and set its Click Action to Change Artboard. Select the artboard containing the plan.
In the Popups tab, create a Popup for the first floor. Choose a title and description you like. To display the number of available units on that floor, you can use the variable {floor 1 available units}. Just enter it in the title or in the content. This is the first piece of live data that we use, so let’s take the chance to briefly explain how live data works in MarkerKit.
How live data binding works in MarkerKit
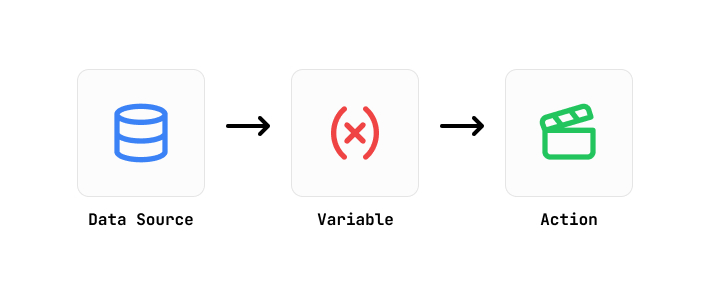
Although Data Binding in MarkerKit is an advanced feature and there is some learning curve, the basics are simple - there are three concepts that you should get familiar with:
1. Data Sources
With Data Sources you can bring live data into MarkerKit. You provide a URL, any headers if necessary and the data is ready to be used in your project. Or, as we will do in this demo, you can just paste a JSON and use that instead.
2. Variables
Variables extract pieces of data from a Data Source. They can be as simple as taking a number or a string, or more advanced like expressions or counting items in an array.
3. Actions
With Actions you can create or modify objects in your project. Actions can use Variables in a few different ways - to modify the properties of an object, or as conditions whether to apply the Action or not. There are more advanced uses, which we won’t cover here.
Set floor availability to sold out
Now that we are familiar with Data Binding, let’s summarize the task. We need to get the count of the available units for the first floor, and change the color of the floor to red if that count is zero.
In this example we will create a Data Source using this sample endpoint:
https://markerkit.com/demos/listings
It’s a simple JSON that contains a list of units with their ID, floor number and availability status:
Now we need to get the number of available units for the first floor. Create a Variable and set its type to Array Length. Choose the Data Source we created in the previous step and select the “listings” array on the right. Currently it will count all units, so click the filter icon and apply two filters:
- key: floor, value: 1
- key: available, value: true
You should see Resolved Value update accordingly.

Next, we need to set the color of the first floor to red if that count is zero.
Create an Action and set its type to Modify Object, and select the first floor as the target Object. Below you will see a list of properties for that object. Each can be set either to a custom value, a variable, or keep it as-is. For Color choose Custom Value and use #ef4444 for example. In our demo we also chose to disable interactivity for floors with no available units. You can find that property at the bottom of the list.

As a final step, we need to apply this action only when the count of available units is zero. With the Action selected, open the Action Conditions tab and add a new condition. Select the Variable we created earlier, == as the operator and “0” (without the quotes) as the value.
On the right side you will see a preview of the result of that Action.
Set unit availability to sold/reserved
Following the same process, we can setup the availability for the units too.
- Create a Variable, filter the array by ID and select the “available” property.
- Create an Action, select the unit polygon and change the color.
- Apply a condition to only change the color of the variable is “false”.
As you have probably guessed by now, this process can get repetitive very quickly. In the next section we will look at how we can get started with automation using the Admin API.
Admin API for automation
MarkerKit provides you with an extensive REST API for making permanent changes to your projects. It’s an excellent tool to automate the process of setting up Variables and Actions for the rest of the floors in our demo.
To get started, you will need an API key. Head over to your Dashboard and generate one. Keep it secret, it gives full access to all your projects.
As an example, let’s copy our artboard with the plan for the first floor, rename the objects and create popups. We will use plain JavaScript. First, we need to fetch the artboard:
Now that we have the artboard object, we can modify its objects before we insert it as a new artboard:
As a last step for this example, we can create a popup for each unit and attach it to the correct polygon object:
We hope this small example gave you an idea of what’s possible with the MarkerKit API. You can automate as little or as much as you want - it’s all up to you. In the demo example there are 18 floors with 10 units each, and using the API saves quite a bit of work.
Embed on your website
When you are happy with the result, head over to Settings -> Embed Code and copy the
Here is an example of how to embed it in a simple HTML page:
Closing words
Your floor plan can now stay perfectly in sync with real-world availability data. No manual PDF edits, no re-exports. MarkerKit’s Data Binding lets you pull live data from any JSON source, while the Admin API helps you scale setup and automation for large developments.
Whether you’re managing a single property or an entire portfolio, MarkerKit can save you valuable time. Try it yourself your next real estate project!
Turn your static images, maps, and diagrams into interactive experiences.
Get started with MarkerKitNo credit card required.
floor plans, and diagrams.